Producing these tutorials and scripts takes a lot of time. If you find the Bullet Physics plugin useful, please consider supporting the project. You can become my Patron or make a one time Donation to the project.
This tutorial requires the free Bullet Physics For Unity Plugin. You can download it from github or get it from the Unity Asset Store. The example files used in this tutorial are included in the github version but the Blender files are NOT included in the Asset Store version because it only allows .fbx files.
- BulletSharpUnity3d on github ** recommended **
- Bullet Physics For Unity Asset Store (Latest version won’t be live before Wednesday Oct 26, 2016)
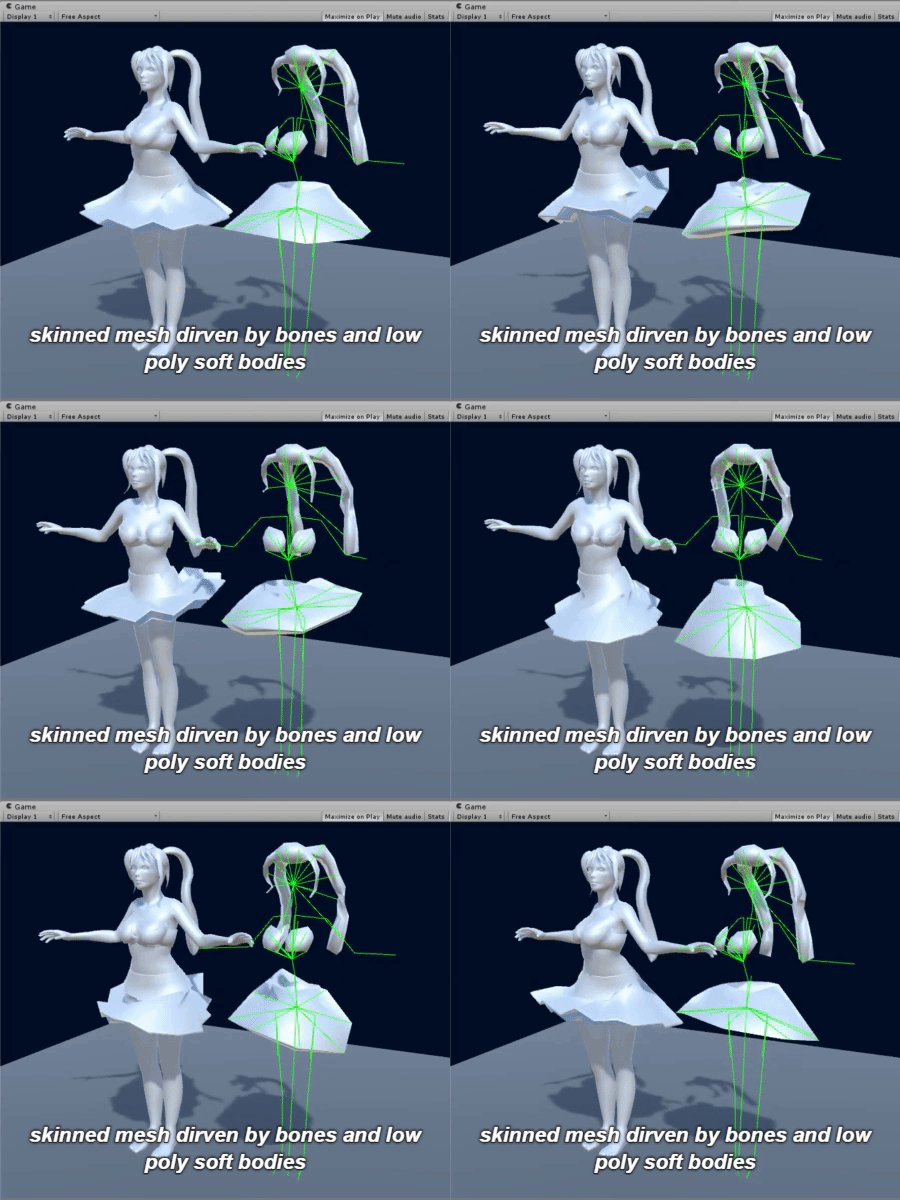
Using Bullet Physics it is possible to attach soft bodies to skinned meshes and use the nodes/vertices in the soft body to drive bones in the skinned mesh. The skinned mesh can be animated and controlled through scripts, and a controller just like any other character. The Bullet Physics Engine will simulate and animate the soft body parts of the character. This is useful for:
- Hairdos
- Skirts and dresses
- Fat rolls
- Double chins
- Breasts
- Handbags, purses
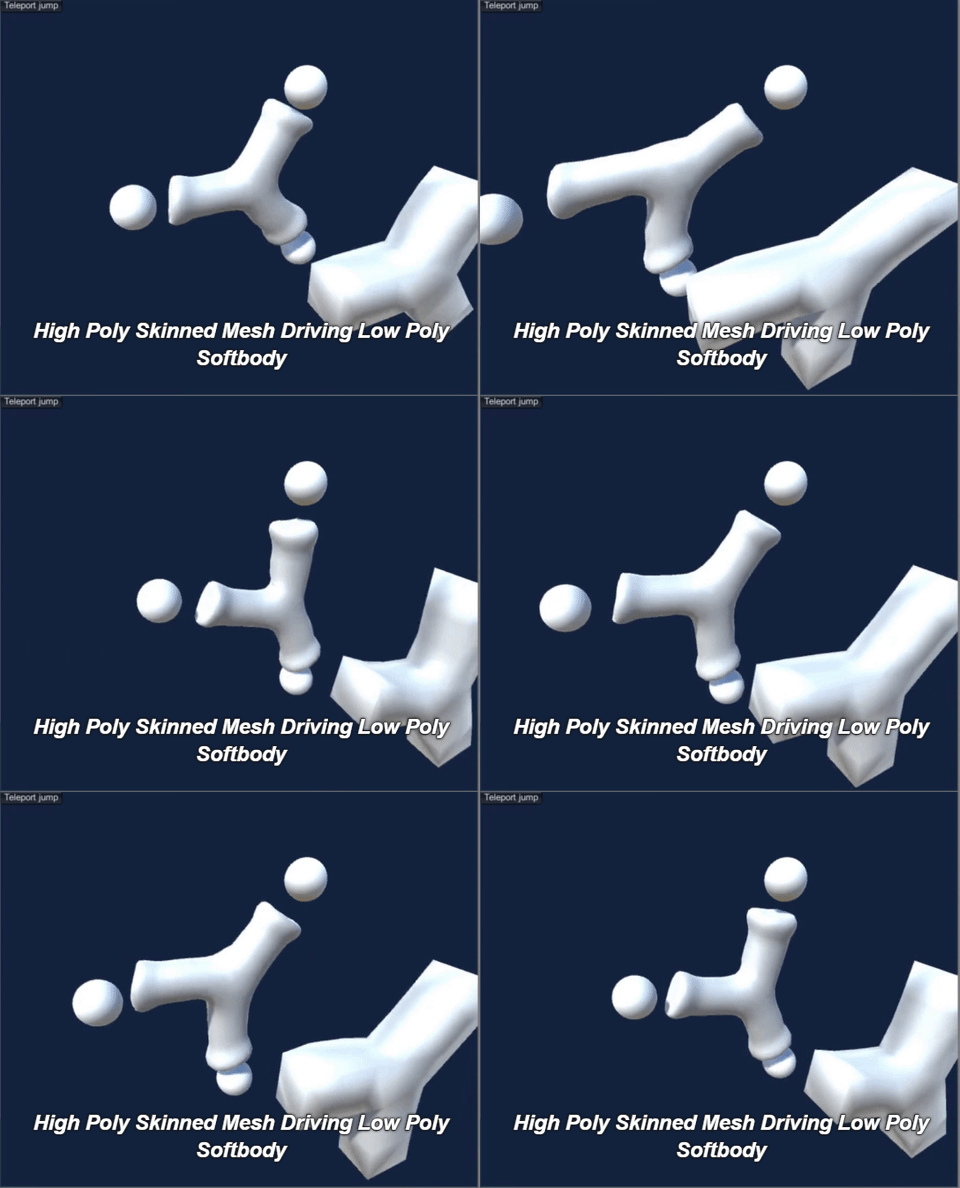
Simulating soft bodies is CPU intensive. The cost can be managed by simulating a very low poly soft body mesh than can be used to drive a much higher poly skinned mesh through bones in the skinned mesh. It also has the benefit that the soft bodies respond to collisions and inertia.
How It Works
This works by anchoring some vertices in the soft body mesh to bones, simulating the soft body, then aligning other bones in the skinned mesh to match some of the simulated vertex positions and rotations.
In Unity a character is rendered using a SkinnedMeshRenderer (SMR) component. The SkinnedMeshRenderer deforms the mesh through a list of ‘bones’. The bones are a hierarchy of Transforms.
A Bullet Physics SoftBody is a mesh that is simulated as a mass & spring system. The vertices, called nodes, are masses and the triangle edges, called links, are springs. Bullet supports “anchoring” some of the nodes to points in space or to another rigid body. A SoftBody can be attached to a bone by:
- Creating a rigid body
- Making it kinematic
- Making it a child of the bone we want to attach it to
- Anchoring some of the nodes in the soft body to the rigid body
The nodes that are anchored to bones get dragged along as the bones move, the rest of the soft body reacts by swinging, bouncing, jiggling as the nodes try to follow the anchors.
The soft body meshes are usually not rendered. They exist only in the mind of the physics engine.
We would like parts of the skinned mesh to deform to match the soft body. This is accomplished by adding extra bones to the skinned mesh that align with nodes in the soft body. The position and rotation of these bones are updated every frame to match the position and rotation of the nodes in the (invisible) soft body mesh.
All of this is accomplished using the BSoftBodyPartOnSkinnedMesh component that is included with Bullet Unity.
Creating The Meshes In A 3D Modeling Program
In this tutorial I will be using Blender but there should be a way to do everything I show in this tutorial in other 3D packages.
You will need at least two meshes:
- A skinned mesh attached to an armature (in this tutorial we will use a humanoid mesh attached to an armature)
- One or more low poly Physics Simulation Meshes
The blender file is saved in the Assets folder of the Unity project.
Modeling The Low Poly Physics Simulation Meshes
Modeling meshes fro physics simulation is different than modeling meshes for rendering. You may find that Blender is fighting you since it is designed to work with meshes for rendering not meshes for physics. There are some important consideration when creating these meshes:
Align With The Armature. The Physics Simulation Mesh should align approximately with armature when the armature is in its bind pose.
Don’t Bind To The Armature When the Physics Simulation Mesh is imported into Unity it will be a MeshRendererMesh.
Uniform Scale (1,1,1) Before importing the model into Unity make sure the scale is 1,1,1. In Object mode you can use Ctrl-A to apply the scale.
Very Low Poly Think of these meshes as “cage meshes” that will envelop the higher poly mesh. The physics simulation is expensive so make the mesh as coarse as possible. A single tetrahedron can produce pleasing deformation.
Topology Remember that edges act like springs and vertices like masses. Try to keep the distribution of vertices even. Poles can create very stable ‘lumps’ in the soft body. Think icosahedron rather than UV Sphere.
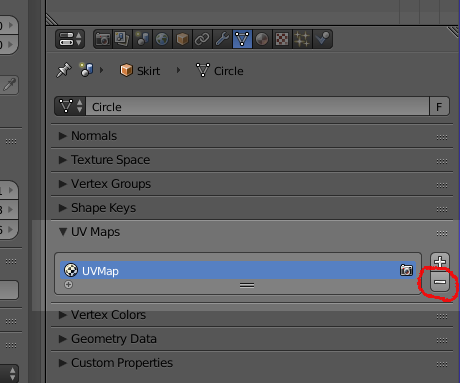
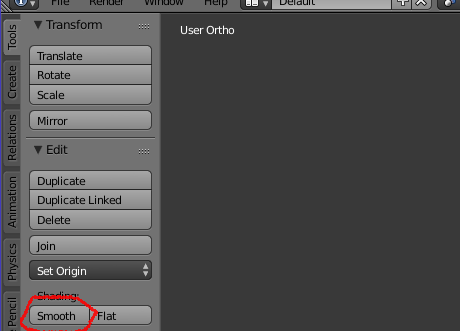
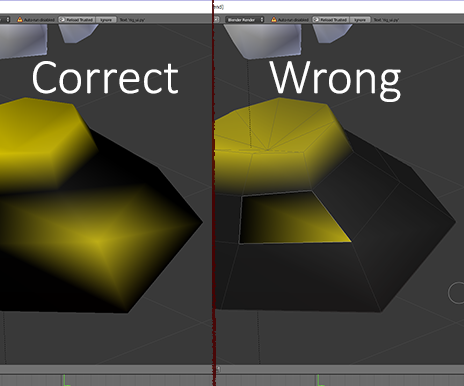
No split vertices. Unity meshes only allow one normal, uv, color etc.. per vertex. If a vertex has multiple values for these channels then the vertex is duplicated. This does not work well for physics simulation because the split vertices will cause cracks in the soft body. Things that can cause split vertices include:
- A UV channel. Delete the UV channel.
- Hard Edges. Use smooth shading
- Vertex colors. Ensure all faces that use a vertex have the same color.
After importing the mesh into Unity check that the number of vertices in the PhysicsSimulationMesh matches the number of vertices in Blender. If the Unity count is higher it means that some of the vertices have been split.
Encode Anchor Information Into The Vertex Colors
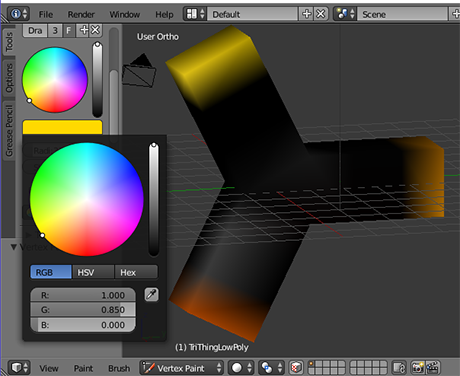
In order to attach the Physics Simulation Mesh to bones, we need to know which nodes are anchors, which anchor they should bind to and the strength of the anchors. This information will be encoded into the Physics Simulation Mesh in the Vertex Color channel.
Blue value is ignored.
Red value is anchor strength. 1 means the node is bound to the rigid body by a very stiff spring. 0 means a very weak spring.
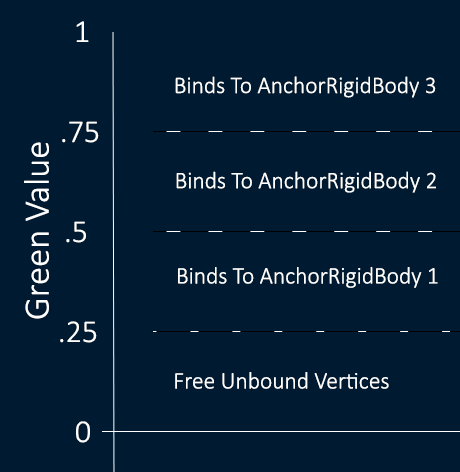
Green value defines which anchor to attach to. The range 0..1 is divided up into bands. You get to define how many bands (anchors) there are. Most of the time you will only be binding to a single anchor. In this case it is best to use two bands
- 0..,5 for nodes not bound to any anchor
- .5..1 for nodes bound to an anchor
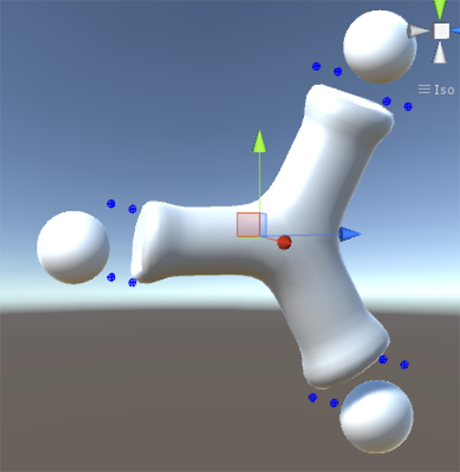
Example Binding Vertices To Three Rigid Body Anchors
The Mesh With Vertex Colors
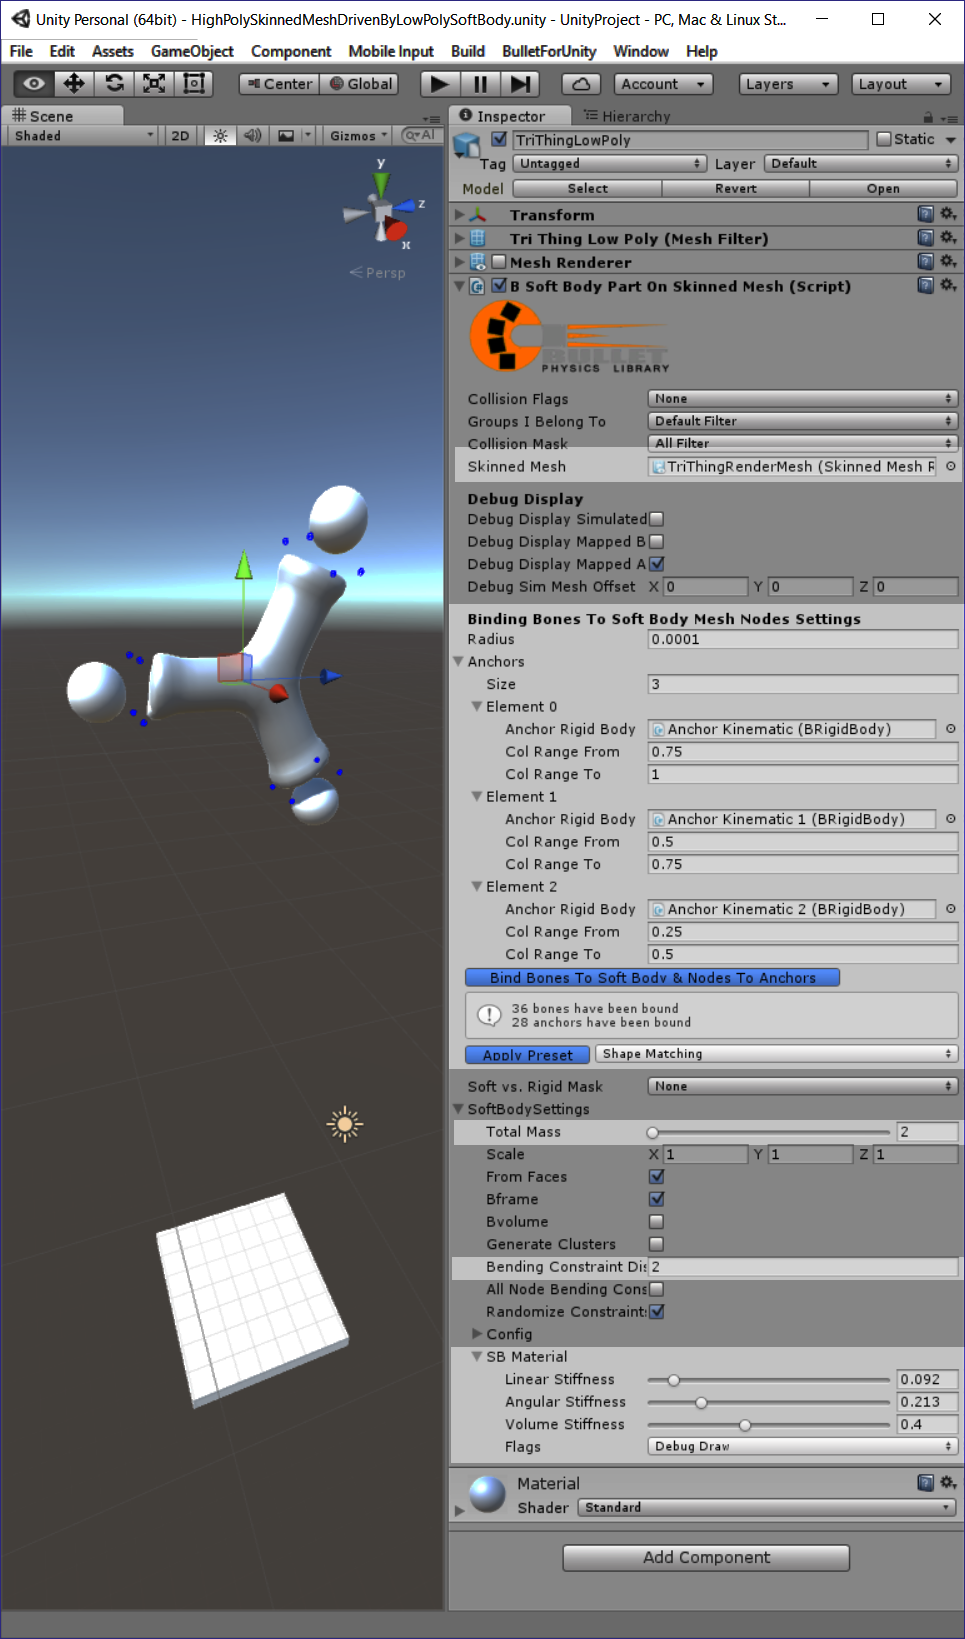
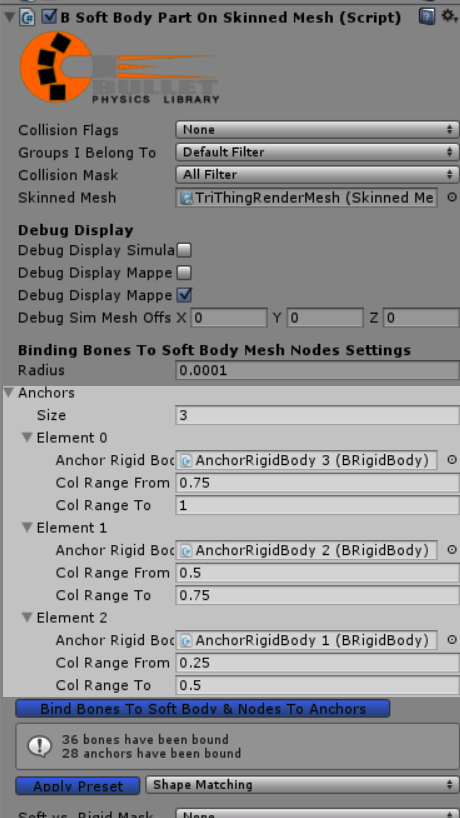
Inspector In Unity Mapping Vertices To Anchors
Add Extra Bones To The Armature and Weight Paint The Skinned Mesh
Extra bones need to be added to the skinned mesh so that the skinned mesh can deform to match the soft body mesh. There is a performance cost to these bones. It takes 100 floating point operations per bone per frame to align the bone to match the skinned mesh. Think carefully about how many bones you really need to deform the skinned mesh.
Make sure your skinned mesh has scale 1,1,1.
Put your skinned mesh in its bind pose by entering Pose mode, selecting all bones and Pose -> Clear Transform -> All
Align your Physics Simulation Mesh with your skinned mesh when your skinned mesh is in its bind pose. This is important later so that we can bind the bones to the simulation mesh in Unity.
IMPORTANT: Don’t arrange the bones in a hierarchy. The bones that will be driven by the Physics Simulation must all be root level bones. This is important because the physics simulation will update the positions of the bones in random order. It may place child bones first, then place the parent bones which will shift the child bone causing bad deformations.
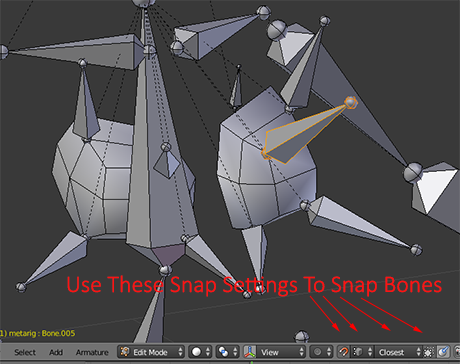
The bones MUST align with vertices/nodes in the Physics Simulation Mesh. To do this use the vertex snapping feature in armature edit mode.
- Snap During Transform
- Type Of Element To Snap To: Vertex
- Snap To Closest
Orient the bones so that they are approximately normal to the model. The model should look like a porcupine.
Weight paint your mesh to work with the new bones. There is nothing special about this step. I won’t cover the details here because it is a large topic and there are many tutorials that do a good job explaining how to do this.
Before importing the mesh into Unity visit ‘pose mode’ and clear all transforms so that the armature is in the bind pose. This is important later so that we can bind the bones to the simulation mesh in Unity.
Rig The Model In Unity
If you have not done so import the latest BulletUnity plugin from the Unity Asset Store or from github.
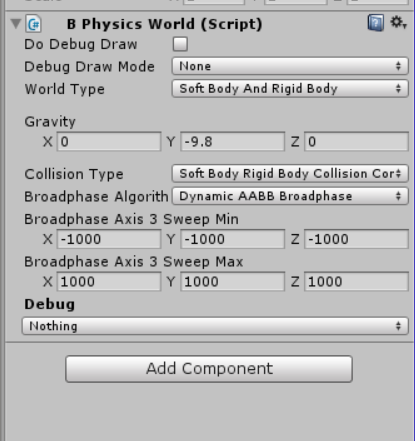
Add a BPhysicsWorld object to your scene. Configure it to handle soft bodies.
Drag your character into the scene. Each Physics Simulation Mesh should exist at the root level of the character hierarchy and should be a MeshRenderer mesh. You can disable (but not remove) the MeshRenderer component on the Physics Simulation Mesh.
Create rigid bodies that will be the anchors. For the anime girl I created three. One for the head (hair). One for the chest (breasts). One for the hips (skirt).
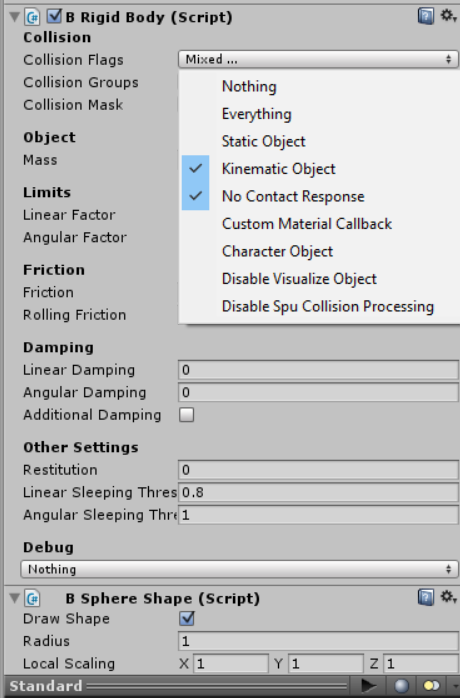
Make the rigid bodies kinematic. Optionally disable the collision response. Remove the renderers. Push play to make sure the anchors move around with the character.
To each of these Physics Simulation Meshes, add and configure a BSoftBodyPartOnSkinnedMesh.cs component as described here:
- Assign the SkinnedMeshRenderer field.
- Adjust the preset to ‘Shape Matching’ or ‘Volume’ and click ‘apply preset’
- Set up the anchors.
Click the “Bind Bones To Soft Body & Nodes To Anchors” button. The ‘radius’ field is used to identify which bones will be bound. Any bone that is within this radius of a vertex in the Physics Simulation Mesh will be bound to that vertex. Check that the correct number of bones was bound. You can also enable “Debug Display Mapped Bones” to see that the correct bones were mapped.
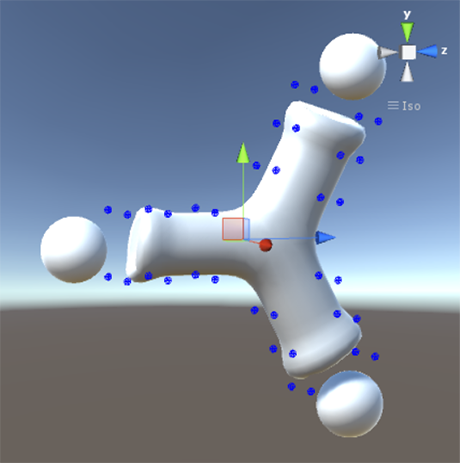
Use the “Debug Display Mapped Anchors” feature to check that the anchors look correct.
Press play and move the skinned mesh bones. The soft body parts should deform realistically.
Tip: You can visualize the skinned mesh and the Physics Simulation Mesh at the same time by checking the “debug display simulation mesh” box and entering an offset in the “debug sim mesh offset” field.
Configuring The Soft Body
There are a bewildering number of soft body settings. I have not had time to look at the source code to see exactly what the settings do. Hopefully, this can be the subject of a future tutorial. Bullet supports a variety of soft bodies including one-dimensional ropes and two-dimensional cloth. Not all values are usable with the BSoftBodyPartOnSkinnedMeshComponent which requires three-dimensional shapes. Here I describe some of the settings that I have found useful.
Preset: Not all values are usable with the BSoftBodyPartOnSkinnedMeshComponent. ShapeMatching and Volume have been tested to work. ‘Volume’ will try to preserve volume. If one end of the shape is squeezed, the other should expand. ‘ShapeMatching’ will try to match a shape.
Total Mass: Needs no explanation.
Bending Constraint: Setting this to 1 results in a softer/floppier softbody. 2 and higher make the soft body stiffer.
Anchor Hardness: How tightly nodes are bound to the anchor. This should probably be set to 1.
Linear Stiffness: This affects the stiffness of the soft body.
Important Note About Teleporting Your Character
Translating your character’s bone’s long distances in a single frame will leave the soft bodies behind. This is like stretching a slingshot across your game world and releasing it. To prevent your character’s hair, breasts, and clothing from wreaking havoc on the rigid bodies in your world. You should reset the soft bodies immediately after translating. Here is an example script:
using UnityEngine;
using System.Collections;
using BulletUnity;

public class TestTeleportJump : MonoBehaviour {

    public Vector3 jump = new Vector3(0f, 10f, 20f);
    // skeleton root
    public Transform root;
    public BSoftBodyPartOnSkinnedMesh[] softBodyParts;
    public BRigidBody[] dynamicAnchors;

    public void OnGUI()
    {
        if (GUILayout.Button("Teleport jump"))
        {
            root.transform.position += new Vector3(0f, 10f, 20f);
            for (int i = 0; i < softBodyParts.Length; i++)
            {
                softBodyParts[i].ResetNodesAfterTeleportJump(jump);
            }
            for (int i = 0; i < dynamicAnchors.Length; i++)
            {
                BulletSharp.Math.Matrix m = dynamicAnchors[i].GetCollisionObject().WorldTransform;
                m.Origin += jump.ToBullet();
                dynamicAnchors[i].GetCollisionObject().WorldTransform = m;
            }
        }
    }
}

